| Theories and Techniques of Oral Implantology (vol.2) (published 1970) | Dr. Leonard I. Linkow |
|
|
Next Page |
| This is an archival HTML version of this book originally hosted here in 2006. The HTML may not display well on modern browsers. Please view the modern PDF Version for a better viewing experience. |
552 Theories and techniques of oral implantology
tooth, where it should continue buccally along the gingival sulci of the abutment teeth. When it reaches the mesial aspect of the most anterior abutment tooth, the incision is angled downward toward the inferior buccal border of the mandible (Fig. 12-49).
The bone exposure should include the external oblique ridge from the retromolar pad area to the area of the nearest natural tooth abutment. The mylohyoid ridge and the lingual surface of the mandible should be exposed, especially in the area where the lingual grooves will be made.
The tissue is peeled away, making sure that all the periosteal tissue against the bone is completely reflected. It is not usually necessary to suture the lingual tissue away from the bone to expose it, as is done during the completely edentulous impression technique. It is relatively easy to obtain a bone impression in the small unilateral edentulous area.
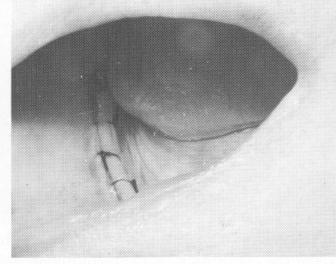
Before the impression is taken, the lingual grooves are made. The length of these grooves is determined by the contour of the bone's lingual surface. If there is a severe undercut from the crest of the ridge ex-tending downward to the lingual surface, the grooves must start near the crest of the ridge and proceed downward to the point where the ridge turns sharply inward. Usually when these severe undercuts exist, the lingual grooves are much shorter. The grooves are made with a narrow tapering diamond point bur and are usually to 1 mm. deep and
1 mm. wide the depth and width of the implant
fingers. The grooves should have no sharp line angles (Fig. 12-50) .
A quick-setting acrylic mix is then manipulated and molded in the operator's hands until it turns to a dry, clay-like consistency. It is then immediately molded over the exposed bone to form the neces-
sary accurate tray. Cold water should be constantly sprayed on it while in the mouth, and it should be removed before it becomes too heated. It is hollowed out slightly, small holes are drilled through it for retention, and it is coated with a good adhesive agent.
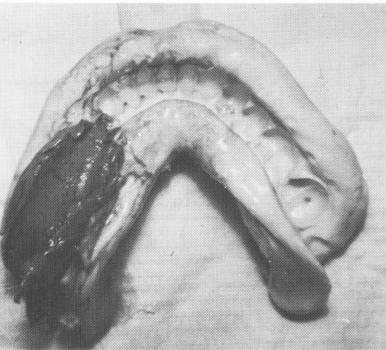
Rubber base or Neoplex impression material is then mixed and placed inside the tray, and the tray is positioned over the site and held for 10 minutes. The tray may be removed, so that the impression may be checked for accuracy, and then replaced, but this is not necessary. A full lower alginate impression of all the prepared abutments as well as of the entire acrylic tray with the rubber base impression is taken. After the alginate has set, the entire mass is removed intact (Fig. 12-51) and the tissues sutured
Fig. 12-51. An elastic (Neoplex by Surgident or Coeflex rubber base by Coe) impression of the bone is taken and "picked up" with a full mouth alginate impression that also includes the prepared abutment teeth.
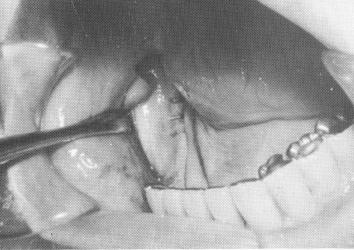
Fig. 12-52. The tissue wound is sutured.
Fig. 12-50. The lingual notches are usually 1/2 to 1 mm. deep and 1 1/2 mm. wide, and all line angles are rounded out.
|
|
Page 552 |
Next Page |
|
Copyright warning: This information is presented here for free for anyone to study online. We own exclusive internet copyrights on all content presented on this website. We use sophisticated technology to identify and legally close down websites that reproduce copyrighted content without permission - so please don’t do it.
|