| Theories and Techniques of Oral Implantology (vol.2) (published 1970) | Dr. Leonard I. Linkow |
|
|
Next Page |
| This is an archival HTML version of this book originally hosted here in 2006. The HTML may not display well on modern browsers. Please view the modern PDF Version for a better viewing experience. |
Subperiosteal implants 551
thus fit flush with the bone, thereby eliminating stretching the tissue (Fig. 12-47) .
Some operators criticize notching the bone for a subperiosteal implant because their experiences in making grooves in other regions of the jaw have led to bone resorption and, consequently, loose-fitting implants. From a great deal of clinical experience, Linkow has found that notching the lingual cortical plate below the mylohyoid ridge has led to little or no resorption in most cases. Three to six weeks after the notches have been made, the lingual fingers fit snugly into the grooves.
Because the lingual peripheral border of the older implant designs was a continuous strut that extended over the mylohyoid ridge, more exposure would rapidly take place once a part of the strut became denuded. Therefore the inferior peripheral border was discontinued. The fingers were left open at their ends so that they were completely inde-
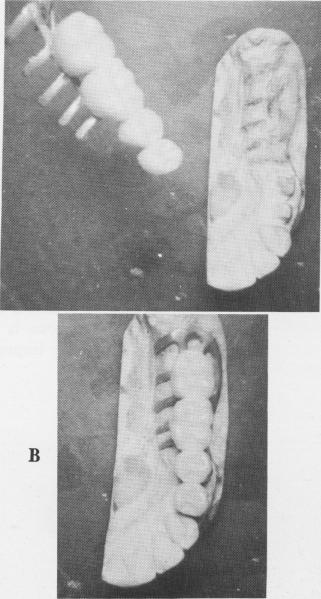
Fig. 12-48. A, A temporary acrylic splint is prefabricated and adjusted to fit over the protruding post of the implant posteriorly and over the anterior tooth abutments anteriorly. B, The accurately fitting temporary acrylic splint positioned over the tooth and implant abutment. It is used for immediate immobilization of the implant. (From Linkow, L. I.: Evaluation of the unilateral subperiosteal implant; eight year report, Dent. Dig. 68:213-217, 1962.)
pendent of each other. In this manner, if any portion becomes exposed, it can be quickly cut off from the rest of the implant and not affect the remaining portions. Fibromucosal tissue quickly fills in the vacated space and covers the bone.
Unlike implantations done with the older type unilateral designs, cases using the open lingual finger implant have proved successful over many years.
The technique used for inserting a unilateral open lingual finger implant differs slightly from that used for seating a full arch implant for a completely edentulous mandible. All teeth that are to be included in the implant bridge are prepared and impressions of them are taken. These include compound tube impressions, a wax bite, an alginate impression of the opposing jaw, and an alginate impression of the prepared teeth and the edentulous area that is to house the implant. From this latter impression, an all-acrylic temporary splint is fabricated to fit over the prepared natural tooth abutments and the implant abutment, to stabilize it immediately after it is placed in position (Fig. 12-48) .
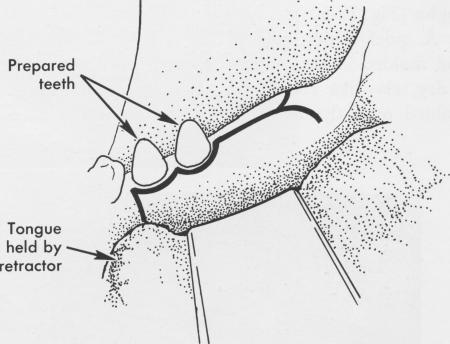
A bone impression must be taken to fabricate the implant itself. To do this, an incision is made from the retromolar pad area, across the crest of the ridge, and anteriorly toward the last two remaining abutments. Here the incision should extend from the crest to the distoproximal surface of the last abutment
Fig. 12-49. An incision is made from the retromolar pad area to the distoproximal surface of the prepared second bicuspid tooth and is continued along the gingival sulcus to the mesial aspect of the prepared first bicuspid tooth. From this point a vertical downward incision is made so that the tissue can easily be retracted.
A
|
|
Page 551 |
Next Page |
|
Copyright warning: This information is presented here for free for anyone to study online. We own exclusive internet copyrights on all content presented on this website. We use sophisticated technology to identify and legally close down websites that reproduce copyrighted content without permission - so please don’t do it.
|