| Theories and Techniques of Oral Implantology (vol.2) (published 1970) | Dr. Leonard I. Linkow |
|
|
Next Page |
| This is an archival HTML version of this book originally hosted here in 2006. The HTML may not display well on modern browsers. Please view the modern PDF Version for a better viewing experience. |
Endosseous blade implants 525
lingually to take advantage of the blade's wedging action.
-
The blade should fit passively into the groove. If the groove is curved, the blade must be bent using two flat-nosed (cone-socket) pliers until a passive fit is achieved.
-
The protruding post of the blade must be checked for buccolingual or labiolingual parallelism with the remaining abutment teeth or abutment implants. This should be done prior to tapping the implants into position. The implant is merely placed into the groove, checked, and if adjustment is necessary—removed. With two cone-socket pliers, one holding the post and the other holding the blade, the neck is bent until parallelism is attained (Fig. 11-199).
-
The implant should be tapped gently into the groove without heavy malleting. However, if it was necessary to bend the neck of the implant, the taps should be confined to the shoulders, rather than the post. If the implant does not sink to its proper depth after a few firm taps, it must be immediately re-moved and the groove deepened. Concentrated heavy or prolonged malleting will result in excessive trauma to the underlying osseous structures and, consequently, a rather rapid failure.
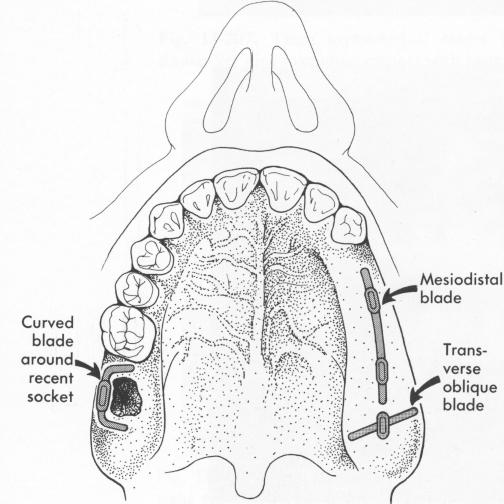
rig. 11-202. An occlusal view of the maxillae, showing a ew of the many blade designs appropriate here. Note that Llthough the body of a blade may be set in any direction, is post follows the arch pattern.
-
The superior surface of the blade's shoulder must be buried 1 to 2 mm. below the alveolar crest. This is imperative for success (Figs. 11-200 and 11-201).
-
Mesiodistal parallelism of a protruding post can be accomplished by grinding directly in the mouth, without fear of loosening the implant.
-
The implant must be extremely tight from the very onset. A loose blade, just as a loose post type implant or triplant, can cause pain and may eventually lead to failure.
-
Once the blade has been correctly seated, the incised tissues should be carefully placed back over the bone in their respective positions. Simple inter-ruptured sutures are sufficient to close them.
-
A blade implant need not be immediately stabilized with a temporary splint, as is always necessary with post type implants. A blade will not loosen if correctly inserted.
-
The sutures can be removed in 5 to 7 days.
-
Impressions are taken whenever the dentist believes that the soft tissues have healed sufficiently. However, the finished prosthesis should be in place no more than 4 to 5 weeks after implant insertion.
Selecting the proper implant design
There is a blade implant for almost every site and every implant problem (Figs. 11-202 and 11-203) . Blades come long, short, shallow, deep, straight, or curved (Fig. 11-204). They may be set along the curve of the dental arch or at any angle to it (Fig.
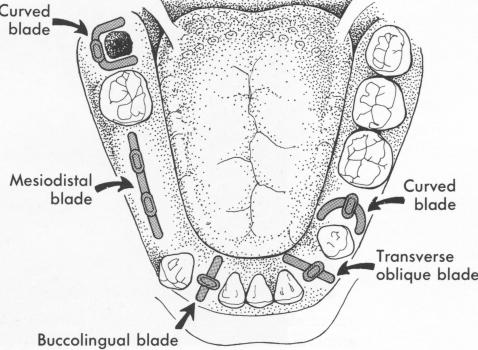
Fig. 11-203. An occlusal view of the mandible, showing several types of blade design. Note the variety of shapes, sizes, and directions in which the body can be set in the arch.
|
|
Page 525 |
Next Page |
|
Copyright warning: This information is presented here for free for anyone to study online. We own exclusive internet copyrights on all content presented on this website. We use sophisticated technology to identify and legally close down websites that reproduce copyrighted content without permission - so please don’t do it.
|