| Theories and Techniques of Oral Implantology (vol.2) (published 1970) | Dr. Leonard I. Linkow |
|
|
Next Page |
| This is an archival HTML version of this book originally hosted here in 2006. The HTML may not display well on modern browsers. Please view the modern PDF Version for a better viewing experience. |
Endodontic implants 589
A
B
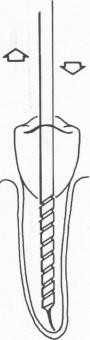
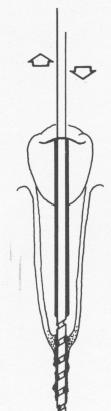
Fig. 13-10. In this simplified technique, only two drills are necessary: A, one to prepare the root for the pin, and B, a smaller one to pierce the apex and prepare the site in bone. To prevent binding and bone injury, drilling is done with an in-and-out movement and is accompanied by a coolant. The endodontic implant is made of Plantanium. (Courtesy The Implant Research Corporation.)
gradually enlarging the root canal with a series of instruments, employs only two drills (Fig. 13-10). With one, an endodontic stabilizer drill whose diameter is slightly larger than the implant itself, a bore-hole large enough to accept the implant is created in one stage. With this drill the root canal is bored to about four-fifths of its depth. To prevent binding and bone injury, the drilling is done with an in-andout movement, accompanied by a coolant. When the root canal has been bored to the proper depth, a smaller diameter endodontic stabilizer drill is used. It perforates the apex of the root and goes into the bone as deep as anatomically possible.
An appropriate sized Titanium endodontic root stabilizer is then fitted into the canal and x-rayed. Any adjustments as to depth and seating must be made before final cementation.
Before cementation, cortisone (Metimyd Ointment) is syringed into the trephined dry bone beyond the apex and also placed on the apical tip of the stabilizer. The cement-coated implant is placed into the canal and pushed into position. The implant is then tapped into the bone another millimeter with a mallet. The protruding part of the implant is snapped off, and the finishing stages proceed much as already described.
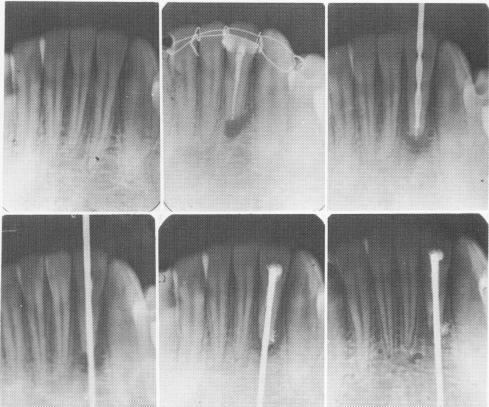
Fig. 13-11. A number of months after an apicoectomy and gutta-percha root canal filling was done on a right loose lateral incisor, the filling was removed and replaced with an endodontic root stabilizer. Within 1 year after its insertion the radiolucency completely disappeared. (Courtesy Dr. V. Bloch.)
The two-stage endodontic pin implant process is clearly illustrated radiographically by two cases. In Fig. 13-11 a right lateral incisor had a periapical lesion and was loose as a result of an accident. The nerve was removed, an apicoectomy was per-formed, and the tooth immobilized with .010 ligature wire. Within a year after endodontic stabilizer insertion, the periapical radiolucency had disappeared.
Another patient fractured a right mandibular central incisor in an automobile accident, severing the nerve in the canal. Pain and looseness of the coronal half of the tooth was obvious. Removal of the damaged nerve and insertion of an endodontic root stabilizer rigidly held the coronal portion of the tooth to the root (Fig. 13-12).
No matter which technique is used to set the implant, the benefit of endodontic implant stabilization is almost immediately apparent. The patient is able to masticate a few minutes after the operation. The self-cleansing lacking in loose teeth will be improved almost automatically. In addition, the patient need no longer fear loosening his teeth further by brushing them. After stabilization proper oral hygiene is again possible. The tongue and lips, which are always loosening mobile teeth, will cease to do
|
|
Page 589 |
Next Page |
|
Copyright warning: This information is presented here for free for anyone to study online. We own exclusive internet copyrights on all content presented on this website. We use sophisticated technology to identify and legally close down websites that reproduce copyrighted content without permission - so please don’t do it.
|