| Theories and Techniques of Oral Implantology (vol.1) (published 1970) | Dr. Leonard I. Linkow |
|
|
Next Page |
| This is an archival HTML version of this book originally hosted here in 2006. The HTML may not display well on modern browsers. Please view the modern PDF Version for a better viewing experience. |
Operative tips 263
operator must try to stay close to the palatal side to prevent perforation. In the mandible, posteriorly, the nerve traverses the ramus through its lingual surface and, as it emerges through the body of the mandible in the molar area, it is still slightly lingual. As the inferior alveolar nerve approaches the first molars, it is still quite close to the lingual surface of the body of the mandible. The location of the canal is camouflaged, however, by the overhanging of the mylohyoid ridge that is always superior to it. Therefore, the canal often appears to be midway between the buccal and the lingual plates of bone when viewing an occlusal film. As it continues to-ward the mental foramen it edges over to-ward the buccal plate. The operator, therefore, must be aware of the nerve's position in the different areas.
If the operator sees in the step-by-step radio-graphs that he is going to perforate an external plate of bone, he should back the drill out and re-angle the tool (Fig. 7-11) . Hopefully the resulting site will not be too large, or another site must be chosen.
When an external table of bone is perforated, another implant site must be selected. If this is not possible, implantation must be postponed until the site heals and can be reevaluated.
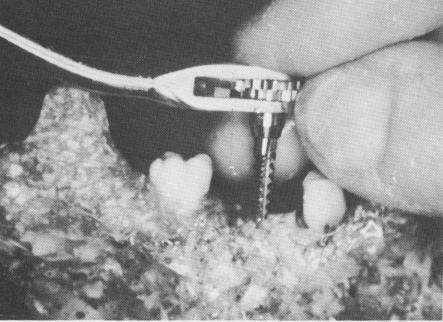
Tapping. The ratchet and taps must be worked in very gently, with steady pressure, holding the ratchet head with the forefinger while the thumb and middle finger guide the tap into position (Fig. 7-12).
The taps should not be forced beyond the bottom of the hole created by the last helical bur. Prolonged continuation of the screwing movement will tend to
Fig. 7-12. Guiding the tap into position.
spoil the bone threading. Although it is difficult at times to determine when the floor has been reached, intraoral radiographs and burs left in neighboring sites will be a great help.
It is sometimes advisable, especially when tapping into dense bone, to tap in both directions. This is done by turning the ratchet lock in a clockwise direction, moving it in that direction three or four times, and then turning the lock to its counterclockwise position and reversing the tapping movements. The tap may be backed out and the bone chips blown out. By continuing the forward and backward motions there is less chance of packing bone chips in the socket, which could create too much pressure. The chips can be saved and reintroduced into the socket when inserting the implant, if desired.
When inserting a tap in very spongy bone, which can be easily ascertained with the first tap, it is often advisable to eliminate the second tap and insert the implant instead. In this manner the fit of the implant will be much tighter.
It is imperative to take enough intraoral radio-graphs to determine parallelism as well as the depth of the burs and taps. As the taps are worked into position with the ratchet, they may be angled to achieve the correct degree of parallelism. Conversely, careless insertion of the taps can ruin any previously parallel sites. If the burs were not completely parallel to each other or to any of the remaining teeth to be included in the prosthesis, parallelism can be still accomplished with the taps.
Prolongators. Sometimes a tap cannot be screwed deeply enough because the cusps of the neighboring teeth obstruct the ratchet head. In these situations, a prolongator may be placed into the ratchet head. This raises the ratchet head above the interfering teeth, thus allowing the tap to be introduced to the desired depth (Fig. 7-13) .
Inserting the implant. Bone chips gathered while boring the socket may be placed in the implant or, in the case of a vent-plant, a bone core taken either from the site itself or from another source may be placed in the vent. Although this is not essential, a paste of cortisone or Calendula Ointment (homeopathic remedy for healing) may also be packed in-side the open spires of an implant just prior to its insertion.
As soon as the operator feels that the implant is starting to thread into the socket, he can switch from the ratchet to a small pliers and continue screwing the implant into its correct position, if preferred.
If too much resistance is felt while inserting a
|
|
Page 263 |
Next Page |
|
Copyright warning: This information is presented here for free for anyone to study online. We own exclusive internet copyrights on all content presented on this website. We use sophisticated technology to identify and legally close down websites that reproduce copyrighted content without permission - so please don’t do it.
|