| Theories and Techniques of Oral Implantology (vol.1) (published 1970) | Dr. Leonard I. Linkow |
|
|
Next Page |
| This is an archival HTML version of this book originally hosted here in 2006. The HTML may not display well on modern browsers. Please view the modern PDF Version for a better viewing experience. |
308 Theories and techniques of oral implantology
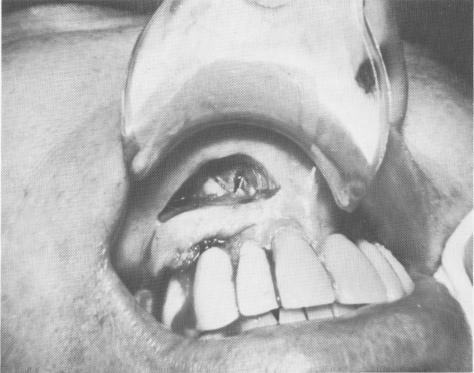
Fig. 7-107. To save a triplant in which one of the pins has perforated the cortical plate, the site may be exposed and the pin shortened.
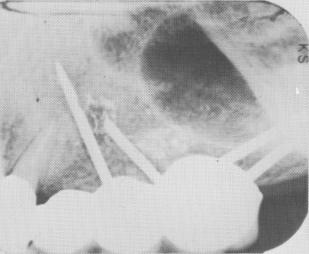
Fig. 7-108. A periapical radiograph showing the shortened pin. The probem has now been eliminated and the implant is secured.
nique are firmly held by the healed soft tissues over their shoulders and by the fibrous tissues that have grown through their large openings.
While the patient is anesthetized, a scalpel must be used to incise the tissues over the implant's shoulders. These tissues are reflected with a periosteal elevator. Then the tissues flanking the facial and lingual surfaces of the blade should be severed with the scalpel. This is usually no problem, as there is a slight space between the bone and blade in failing cases. The blade can then be removed with an extraction forceps, a wide-nosed pliers, or a bridge remover.
A loose implant—whether it be of the blade, screw, or pin type—usually should be removed if pain accompanies the looseness. Sometimes, how-ever, it is possible to tighten a loose blade by wedging a horizontal metal bar between the bone and
either the buccal or lingual surfaces of the embedded blade. If the patient is pain-free and immediate retention and stability are again achieved by this technique, it may be employed. Also, it may be possible to immediately replace a failing blade with another one. After the failing blade is taken out, any granulation tissue in the site is removed. Another wider implant of the same design may be inserted or the groove made deeper and wider anteroposteriorly to accommodate a different shaped blade.
Failing subperiosteal implants
The removal of a failing subperiosteal implant, especially a full arch implant, is very difficult and time-consuming. The cleaner the surgery, the less the postoperative edema, induration, and pain.
It is very hard to make one clean incision along the crest of the ridge because of the protruding implant posts. It is even more difficult to separate the mucoperiosteal tissues from the implant framework, because they have become firmly embedded in and around the primary, secondary, and peripheral struts. Usually they must be severed in many areas to even slightly move the framework.
Sometimes the framework or a portion of it, particularly the most distal posterior cross-strut spanning the alveolar crest, has sunk into the bone. This usually occurs when the implant has been set over alveolar bone—a contraindication in the first place
and as much as 2 or 3 mm. of new bone may have grown over the implant (Fig. 7-109). In such a situation, a carbide fissure bur must be used to expose the buried implant. The easiest way to reveal the implant is to start drilling at the nearest exposed portion of the strut and to follow it slowly, removing the bone along the same lines (Fig. 7-110). Once the implant is totally exposed, cone socket pliers or extraction forceps may be used to gently pull the framework away from the bone, carefully dissecting away any interfering fibrous tissue with a sharp scalpel, periosteal elevator, and hemostat.
If retention screws have been used to immediately secure the implant upon insertion, these must be removed before the implant itself is removed. Otherwise the bone may tear, or the screw may accidentally be left in the bone. The screws are re-moved by screwing them out counterclockwise with a small screwdriver, preferably a Vitallium one.
Sutures are required to cover the entire under-lying bone so that none of it is exposed. Any uncovered bone will cause a great deal of postoperative pain and discomfort. It is often necessary to
|
|
Page 308 |
Next Page |
|
Copyright warning: This information is presented here for free for anyone to study online. We own exclusive internet copyrights on all content presented on this website. We use sophisticated technology to identify and legally close down websites that reproduce copyrighted content without permission - so please don’t do it.
|