| Theories and Techniques of Oral Implantology (vol.2) (published 1970) | Dr. Leonard I. Linkow |
|
|
Next Page |
| This is an archival HTML version of this book originally hosted here in 2006. The HTML may not display well on modern browsers. Please view the modern PDF Version for a better viewing experience. |
Endosseous blade implants 489
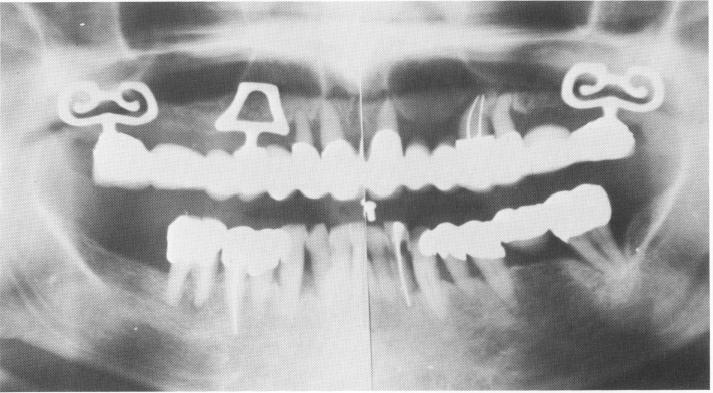
Fig. 11-84. A Panorex of the completed upper restoration. This was a referred patient who requested that only the upper arch be reconstructed. Today, since we know the true value of the blades, the anterior teeth would be extracted and replaced by two more blade implants.
Case 8
Blade implants combined with the nonparallel pin technique
It is sometimes neither necessary nor advantageous to prepare all remaining anterior teeth for full crown restorations, particularly when they are caries-free and esthetically acceptable. Instead, the anterior quadrant of teeth can be splinted to full coverage restorations in both posterior quadrants by using a gold splint that passes behind the teeth and that is held in position by pins pushed horizontally through the anterior teeth into the splint.* A case in point was done on a woman patient in her late forties.
The remaining posterior teeth on both sides of the arch were prepared for full crown restorations. A wax interocclusal record of centric relation was made and compound tube impressions, a plaster index, and opposing jaw alginate (irreversible hydrocolloid) impressions were taken.
From intraoral periapical x-rays, the most advantageous location between the incisal edges and the height of the pulp horns for perforating the four anterior teeth were then determined. These sites were marked on the teeth with indelible pencil.
The enamel of the anterior four teeth was perforated labially, with an obliquely angled No. car-bide round bur. A long-shanked Splint-mate system R3 round bur in a contra-angle was then used to
*Splint-mate system, Whaledent, Inc., New York, N.Y.
complete the perforation through each tooth. A Splint-mate system E4 end-cutting bur was used to align and enlarge the apertures enough to accept the positioning pins (Fig. 11-85). A shallow hole approximately to mm. wide was countersunk into the cingulum area of each incisor tooth with a No. 6 round bur to help retain and seat the lingual gold castings.
To make an impression for fabricating the gold splint, any well-fitted stock perforated tray with a labial cut-out allowing for clearance of the positioning pins could have been used. The tray was loaded with an elastic impression material. Just before inserting it in the mouth, the positioning pins were pushed out labially so that their intraoral extensions were flush with the lingual surfaces of the anterior teeth (Fig. 11-86). Immediately after the loaded tray had been set over the anterior quadrant of teeth, the positioning pins were pushed lingually until their intraoral ex-tensions contacted the lingual surface of the tray (Fig. 11-87). After the impression hardened, the pins were withdrawn from the teeth in a labial direction and the tray was removed. The positioning pins were then reinserted into the impression material, and it was sent to the laboratory (Fig. 11-88). The small perforations in the teeth were sealed with temporary cement before the patient was dismissed.
On the following visit, the anterior splint was tried in the mouth by positioning it from the lingual aspect. The two cuspid and posterior veneer crown restorations were fitted, articulated, and balanced
|
|
Page 489 |
Next Page |
|
Copyright warning: This information is presented here for free for anyone to study online. We own exclusive internet copyrights on all content presented on this website. We use sophisticated technology to identify and legally close down websites that reproduce copyrighted content without permission - so please don’t do it.
|