| Theories and Techniques of Oral Implantology (vol.2) (published 1970) | Dr. Leonard I. Linkow |
|
|
Next Page |
| This is an archival HTML version of this book originally hosted here in 2006. The HTML may not display well on modern browsers. Please view the modern PDF Version for a better viewing experience. |
462 Theories and techniques of oral implantology
A
B
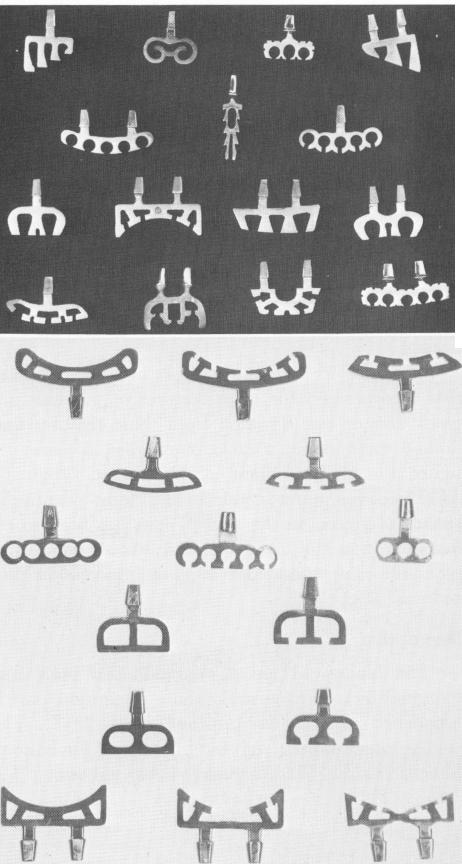
Fig. 11-2. A, Various blade implants. B, The shape of blade-vents may be changed to suit the site. The far left implant in each row is the basic implant; others in the row are variations.
mm. in thickness. Its anteroposterior dimension is quite broad and contains holes of various sizes and shapes (Fig. 11-2). These holes are much larger than the spaces in post type implants, thus enhancing bone deposition.
The shoulder of the wedge must be set 1 or 2 mm. below the cortical plates at the alveolar crest. If the alveolar crest is shallow, the superoinferior aspect of the wedge may be shortened. Shortening the implant in this manner does not reduce its retentive potential because retention is
based on the width, not the depth, of the implant. Thus, if the landscape of a particular site is unusual, the operator can sketch an appropriate blade shape directly on the radiograph and have it made to order.
Atop the wedge is the narrow neck that will ex-tend upward through the tissues and into the oral cavity where it becomes thicker to form the post. The length of the neck is variable. The operator may choose that length most appropriate to the problems of a particular site. If the implant can be buried very deep, a long neck is needed to reach the oral cavity. If the fibromucosa is particularly thick and the operator chooses not to thin it before the implant intervention, the long-necked blade implant can be used. If a short post is required to ensure occlusal harmony, a short-necked implant may be selected. The neck may also be easily bent so that the implant may be set most advantageously into bone, with the prosthesis-bearing portion parallel to other abutments.
Basic insertion techniques
The blade-vent is easy to insert; this is one of its chief advantages. Briefly, neighboring teeth are prepared as abutments. Then the bone is exposed and a slot prepared for the implant. The implant is set in the slot, tapped into place, and the tissues sutured closed over the site. Details of this summary and variations in the basic procedure follow.
-
The mucoperiosteal tissues should be incised directly over the center of the alveolar crest, down to the bone, with a sharp scalpel (Fig. 11-3). The incision should be slightly longer than the anteroposterior length of the blade and made cleanly and evenly. Cross incisions are not used because they complicate healing.
-
The soft tissues should be carefully retracted with a periosteal elevator and must be completely separated from the bone. Tearing or destroying periosteal tissue during retraction will result in healing by secondary, rather than primary, intention. This will cause undue pain and bone resorption.
-
When the bone is clearly exposed, a groove is made with a No. 700L tapering fissure bur (Fig. 11-4) . This extends through the cortical plate and deeper into the medullary bone. The depth of the groove should be the same as the blade itself. The groove must be made evenly (Fig. 11-5) . Its length should never be shorter than the actual anteroposterior length of the blade measured at its widest dimension (Fig. 11-6). It can be made slightly longer
|
|
Page 462 |
Next Page |
|
Copyright warning: This information is presented here for free for anyone to study online. We own exclusive internet copyrights on all content presented on this website. We use sophisticated technology to identify and legally close down websites that reproduce copyrighted content without permission - so please don’t do it.
|